Replicators
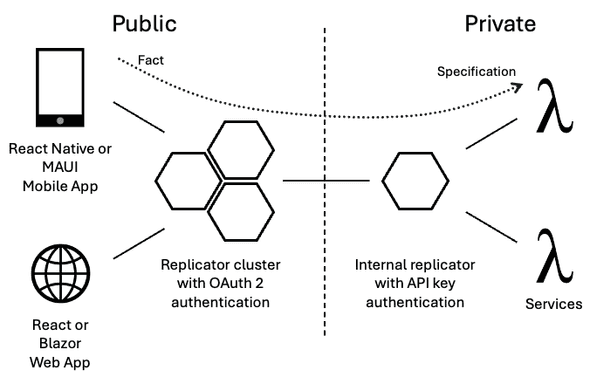
The Jinaga Replicator is the central infrastructure component of your network. It plays the role of:
- Database
- REST API
- Message queue
- WebSocket server
You can connect client applications to a replicator to read and write facts. You can also connect back-end services to a replicator to subscribe to facts and process them. Connect replicators to one another to form a network. Facts will flow between replicators according to the specifications you define at the edge.
Deploying Replicators
You can deploy a replicator in three ways:
Choose the method that best fits your needs. The Jinaga Portal is the easiest way to get started. Docker is a good choice to deploy a replicator on your own infrastructure. And the NPM package gives you the most control.
Jinaga Portal
To get started, create a replicator of your very own on the Jinaga Portal. You can create a free replicator for development. To purchase a new replicator for production, please visit the Azure Marketplace.
When you publish a Replicator, you will be given a URL. This URL is the endpoint that you will configure your client applications to use.
Docker
If you would like to run replicators on your own infrastructure, you can use the Docker image. Install Docker Desktop. Then run the following commands from the command prompt (Mac Terminal, Windows PowerShell, or WSL2).
docker pull jinaga/jinaga-replicator
docker create --name my-replicator -p8080:8080 jinaga/jinaga-replicator
docker start my-replicator
This creates and starts a new container called my-replicator.
The container is listening at port 8080 for commands.
NPM Package
If you would like to run the Replicator in your own Node.js application, you can use the Jinaga Server package.
You will first need to run a PostgreSQL database.
Use the jinaga-postgres-fact-keystore image to create a pre-configured database.
docker pull jinaga/jinaga-postgres-fact-keystore
docker create --name jinaga-postgres -p5432:5432 \
  -e POSTGRES_PASSWORD=secretpw \
  -e APP_USERNAME=appuser \
  -e APP_PASSWORD=apppw \
  -e APP_DATABASE=appdb \
  jinaga/jinaga-postgres-fact-keystore
docker start jinaga-postgres
If instead you prefer to run your own instance of PostgreSQL, use the migration script to set up a new database.
Once you have a database, install the Jinaga Server package.
npm install jinaga-serverThen create a new server.
import express = require("express");
import * as http from "http";
import { JinagaServer } from "jinaga-server";
import process = require("process");

process.on('SIGINT', () => {
  console.log("\n\nStopping replicator\n");
  process.exit(0);
});

const app = express();
const server = http.createServer(app);

app.set('port', process.env.PORT || 8080);
app.use(express.json());
app.use(express.text());

const pgConnection = process.env.JINAGA_POSTGRESQL ||
  'postgresql://appuser:apppw@localhost:5432/appdb';
const { handler } = JinagaServer.create({
  pgStore: pgConnection
});

app.use('/jinaga', handler);

server.listen(app.get('port'), () => {
  console.log(`  Replicator is running at http://localhost:${app.get('port')} in ${app.get('env')} mode`);
  console.log('  Press CTRL-C to stop\n');
});
The replicator is ready to receive requests at http://localhost:8080/jinaga.
Initializing Data in the Replicator
Before writing a client application, you can read and write facts directly to the replicator.
Use a tool like httpYac or Postman to POST messages to the /write and /read endpoints.
You can download the example httpYac files or example Postman collection to try it yourself. Edit the example and enter your own replicator URL.
Configuring for the Jinaga Portal
For httpYac, add your own .env.local file with the following values:
replicatorUrl=https://rep.jinaga.com/xyz123

oauth2_authorizationEndpoint=https://rep.jinaga.com/xyz123/auth/apple
oauth2_tokenEndpoint=https://rep.jinaga.com/xyz123/auth/token
oauth2_clientId=xyz123
oauth2_usePkce=true

authorizationEndpoint=https://app.jinaga.com/xyz123/authorization
distributionEndpoint=https://app.jinaga.com/xyz123/distribution
secret=zyx321
Get the actual values from your replicator after setting up authentication, authorization, and distribution.
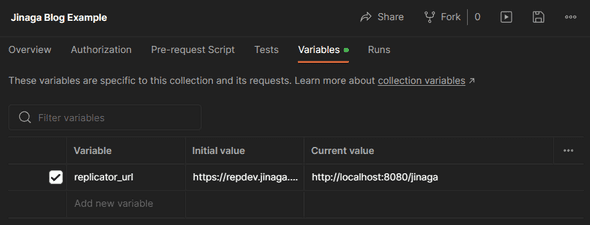
For Postman, enter the replicator URL and other values in the Postman collection variables.
Configuring for Docker or NPM
If you are using httpYac, create a file called .env.local in the same folder as the request files.
Copy the following configuration setting into the file.
replicatorUrl=http://localhost:8080/jinagaIf you are using Postman, edit the collection variables and enter the replicator URL http://localhost:8080/jinaga.


